I have been re-building my linux server, this time moving from Fedora to Ubuntu as part of re-learning and improving on my linux skills. Decided to resurrect my Asterisk lab, which means having an excuse to fire up my Cisco 3750 PoE switch and my SIP phones.
I remember it gave me so much pain building asterisk over Fedora, so much caveats to consider that I did not get to document everything. Moving to Ubuntu, there are so many resources online and seems more straigh forward. Here were the steps I took to get Asterisk 16 LTS running on my Ubuntu Server 18.04 LTS.
First step, best practice would be just to make sure your server is up to date.
sudo apt update && sudo apt -y upgrade
sudo reboot
Obviously, if you are currently ssh’d(if there’s such a word) into it this will cut you off your connection.
Before we proceed, I would suggest to download the dependency package. Take it from me, doing this prior to installing asterisk would save your sanity. When I initially installed asterisk over Fedora and did not follow this step, it drove me mad.
sudo apt -y install git curl wget libnewt-dev libssl-dev libncurses5-dev subversion libsqlite3-dev build-essential libjansson-dev libxml2-dev uuid-dev
Now, it is time to do the install. Go to the following directory:
cd/usr/src/
sudo curl -O http://downloads.asterisk.org/pub/telephony/asterisk/asterisk-16-current.tar.gz
Once the file is downloaded, extract the file.
sudo xvf asterisk-16-current.tar.gz
ok, it has been extracted time to go to the asterisk folder and install mp3 source and pre_requisite files.
cd asterisk-16*/
sudo contrib/scripts/get_mp3_source.sh
sudo contrib/scripts/install_prereq install
Note, this may take some time. Well it was on my PC. Actually the next few steps, make take some time to finish so you can use this time to maybe do your laundry, watch a cbt-nugget videos as there is some waiting involved.
Another note, I have done installs where you’re going to get an error message saying “svn: not found”. To fix this you will have to install subversion:
sudo apt install subversion
That should fix the issue and you can go ahead and install mp3 and pre-requisite files.
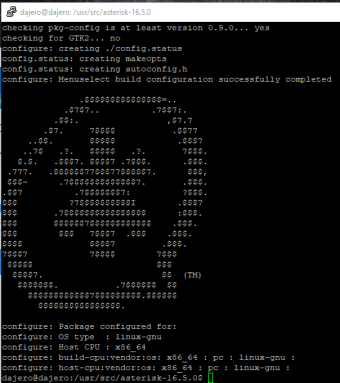
Time to configure the pbx, this is where the fun begins!..well I think it is. type:
sudo ./configure
After maybe making yourself some coffee you’ll end up with the screen below:
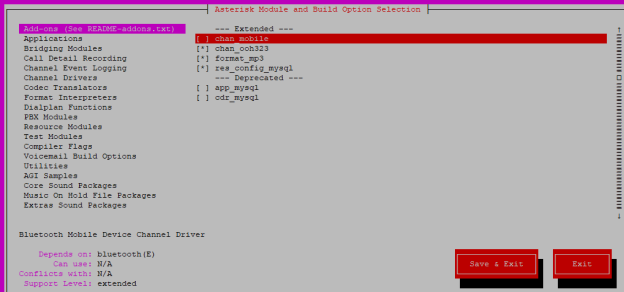
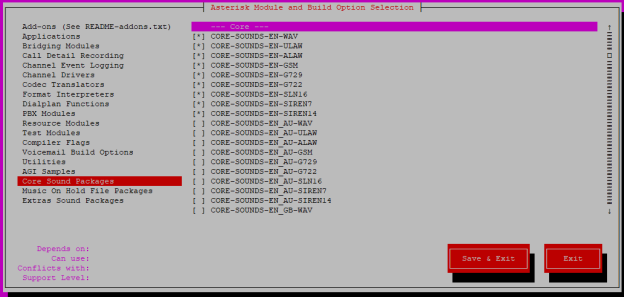
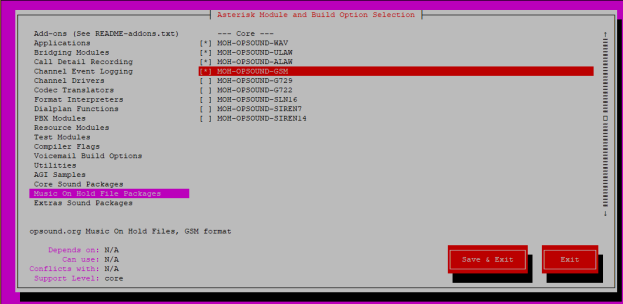
To install additional feature set type:
sudo make menuselect
Just look at the screenshots below and make sure you follow along what has been ticked. Don’t forget to Save & Exit.


Once you are back at the CLI, run the following commands:
sudo make
sudo make install
Each one would take time, I would probably be able to cook an entire meal while I wait for each item to finish its install. If you did cook yourself or your family a meal, have some lunch or dinner. Go back to your server and maybe install the documentation. You can do this by typing:
sudo make progdocs
This is going to take a while again so take this opportunity to have a stroll by the park and visit the neighbours and have a chat. Then when done, run the following to finish configuration:
sudo config
sudo make samples
sudo ldconfig
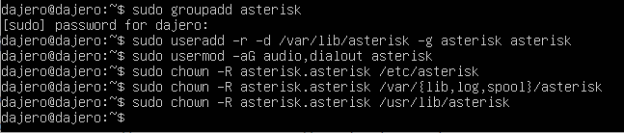
Now let us create the asterisk user group and user. Just follow along as per the screenshot below:
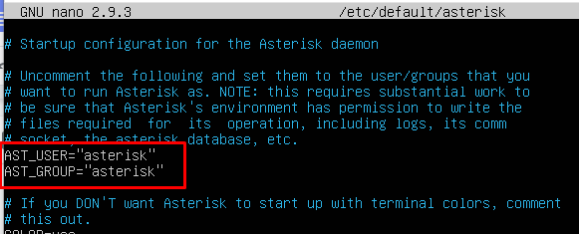
Using your preferred text editing tool, for myself I use nano.
sudo nano /etc/default/asterisk
Remove the # infront of AST_USER and AST_GROUP. Make sure you save your work. If you are using nano, Ctrl+O to save, Ctrl+X to exit out.
Next we will edit the asterisk.conf file. Again don’t forget to save your work.
sudo nano /etc/asterisk/asterisk.conf

Make sure you run the following command to wrap up your configuration with:
sudo systemctl restart asterisk
sudo systemctl enable asterisk
The first one restarts the service specially making any change on the system, while the other enables asterisk to start after a system reboot.
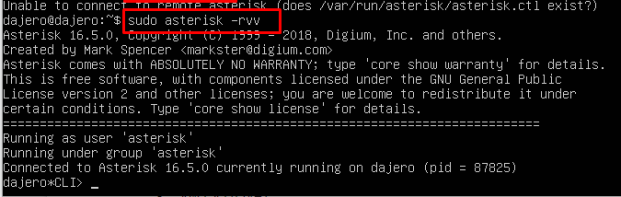
Moment of truth, to access asterisk just type the following command as per the screenshot below. Once you see *CLI> next to the cursor then you good to go.
By the way, if you are running the linux firewall (ufw) make sure you enable ports 5060 & 5061 as per below:

To verify your firewall rules just type:
sudo ufw status numbered
There you have it! Probably the entire process is less than 3 hours from my experience it may be quicker from your end depending on the laptop, PC or infrastructure you are using. In the next related post, we’ll configure this bad boy to make its first internal call.
I hope you guys were able to follow along.
Stay tuned!

runnning sudo contrib/scripts/get_mp3_source.sh gives error,
svn: E170013: Unable to connect to a repository at URL ‘http://svn.digium.com/svn/thirdparty/mp3/trunk’
svn: E000110: Error running context: Connection timed out
installing via sudo apt install subversion
doesn’t solve the problem.